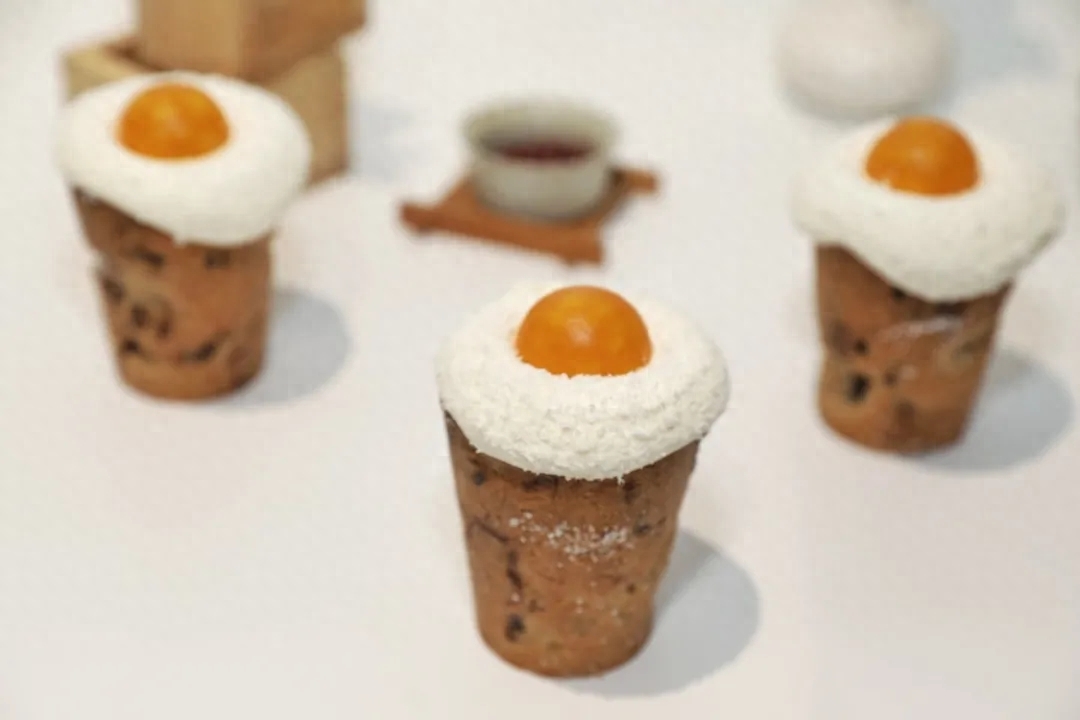
比KFC还好吃的真·云朵蛋挞

叮~你的蛋挞新鲜出炉咯! 刚出炉的蛋挞热乎乎的,一口咬下去,蛋白霜柔软的口感配上酥脆掉渣的外皮,再加上滑嫩的蛋液,味道绝了!!!
By 七分饱同学
用料
- 蛋挞皮 12个
- 细砂糖 80g
- 蛋黄 3个
- 低筋面粉 20g
- 奶油奶酪 100g
- 原味酸奶 200g
- 纯牛奶 120g
- 黄油 15g
- 蛋白 2个
做法步骤

1、将蛋挞皮放入烤箱200度烤制,直至蛋挞皮呈金黄色

2、碗中加入3个蛋黄和40g白砂糖搅拌均匀

3、筛入20g的低筋面粉,搅拌均匀后放置一旁备用

4、锅中倒入纯牛奶加热至周围微微冒泡后离火

5、慢慢冲入之前的蛋黄糊中,要边搅拌边冲入哦~

6、再将混合好的蛋黄糊倒入锅内开小火不断搅拌

7、一直加热至浓稠后,关火加入黄油,混合均匀

8、混合均匀后倒入碗中,包上保鲜膜,放置冰箱冷藏备用

9、100g奶油奶酪隔水化开并搅拌均匀

10、加入白砂糖搅拌均匀,搅拌至细腻状态后200g原味酸奶

11、全部搅拌均匀后放入裱花袋备用

12、将先前冷藏好的夹心用打蛋器搅拌均匀,装入裱花袋

13、接下来开始组装啦

14、奶油奶酪挤入蛋挞皮打底

15、挤上冷藏好的夹心

16、接下来开始制作云朵部分 碗中倒入2个蛋白和40g白砂糖

17、用打蛋器打发至拉起呈小尖角的状态就好啦

18、然后将蛋白霜挤在蛋挞上

19、随意的摆弄一下造型

20、放入200摄氏度的烤箱烤制3分钟左右!

21、云朵蛋挞就完成啦!
做菜好吃都有技巧,我的每道菜都有小妙招,大家搜索“豆果”可以直接查看我的菜谱!
喜欢这个食谱记得收藏、关注哦!欢迎在下方留言分享您对这道美食的建议。
[注:本文部分图片来自互联网!未经授权,不得转载!每天跟着我们读更多的书]
互推传媒文章转载自第三方或本站原创生产,如需转载,请联系版权方授权,如有内容如侵犯了你的权益,请联系我们进行删除!
如若转载,请注明出处:http://www.hfwlcm.com/info/62549.html
相关文章
-
私房烘焙 I 十款经典配方THE BEST TOP TEN有这样10款配方,它们出道即巅峰,不但在线上的私房市场叱咤风云,在线下的门店,甚至是便利店体系的销售中也是市场霸主。不管同期出现多少
-
粉丝福利抽奖进行有半个多月了,我发现大家对打蛋器的热情格外高。今天的抽奖继续来抽君焙打蛋器吧~10台奖品,1天后(5月14日)开奖,直接拖到文章末尾参加抽奖!来吧~~看看今天
-
这个超简单,只用打蛋器,都不用刮刀,真的超赞~ 但是,从倒入面粉开始,就不要打过了 面粉打到看不干粉 牛奶搅拌均匀 油搅拌均匀 就行了~By 林依大脸_ 【豆果美食官方认证达人
-
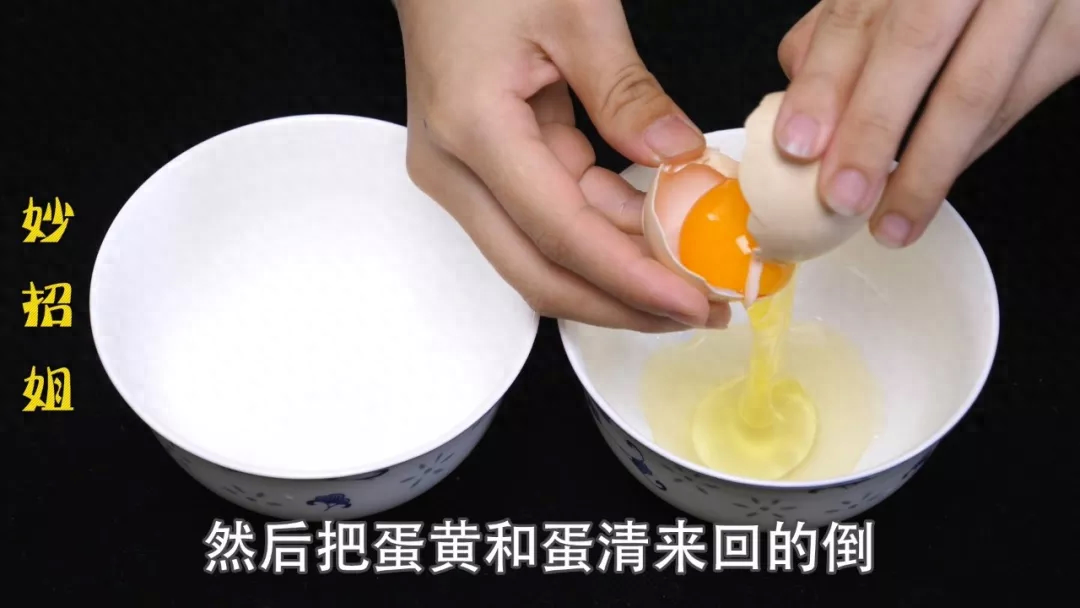
大家好,我是妙招姐,今天妙招姐来教大家两个关于鸡蛋的小妙招,第一个教你如何快速的分离蛋黄和蛋清,第二个教你自制打发蛋白的神奇,下面大家就跟着妙招姐一起来看看吧分离
-

来源:经济日报-中国经济网1月24日开始,数亿消费者过上了“宅生活”。“宅家为国”时期,大家都在家里如何打发时间?拼多多19日公布的一组榜单显示,这段时间,中国消费者最经
-
揉捏拉扯不变形,高温蒸煮30秒,无异味残留。油刷刷刷刷,充分不惧掉毛,搅拌面粉毫无压力。打蛋器轻松打散,毫不费力。小刮刀刷刮刀,轻松刮除碗壁残余,大刮刀、煎铲刷刮刀,
-
打蛋器搅团。打蛋器做的搅团你吃过吗?今天中午没买菜,继续来霍霍面粉吧。·面粉加水搅成面糊,小时候最讨厌吃搅团,更讨厌吃韭菜,长大以后那些小时候讨厌的食物都变成了喜欢
-

我们在做烘培的时候,经常都要打发蛋白,特别是在做蛋糕的时候,这就是必不可少的工作了,蛋糕做得好不好,就得看你蛋清打发得好不好了,可以说蛋清的打发就是物理打发的一个